Introduction to Photogrammetry
Photogrammetry is increasingly used in the creation of 3D models. This is the field of science, which deals with the reproduction of sizes, shapes and location of objects based on photogrammetry photos.
There can be distinguished ground and air photogrammetry. Depending on how the images are taken: one-image or two-image photogrammetry – called stereophotogrammetry. In the latter case, the image of the object or terrain is obtained by means of a stereogram, ie a pair of photos from two points in space.
The initial application of this field of science was to use it when creating maps in geodesy. The history of photogrammetry dates back to 1858 when the first photogrammetry pictures were taken in Paris using a balloon. It is also used in geology to search for natural resources, architecture for the inventory of monuments, as well as archeology, metrology, forestry and medicine.
Recently, photogrammetry has become more and more popular in scanning of 3D models.
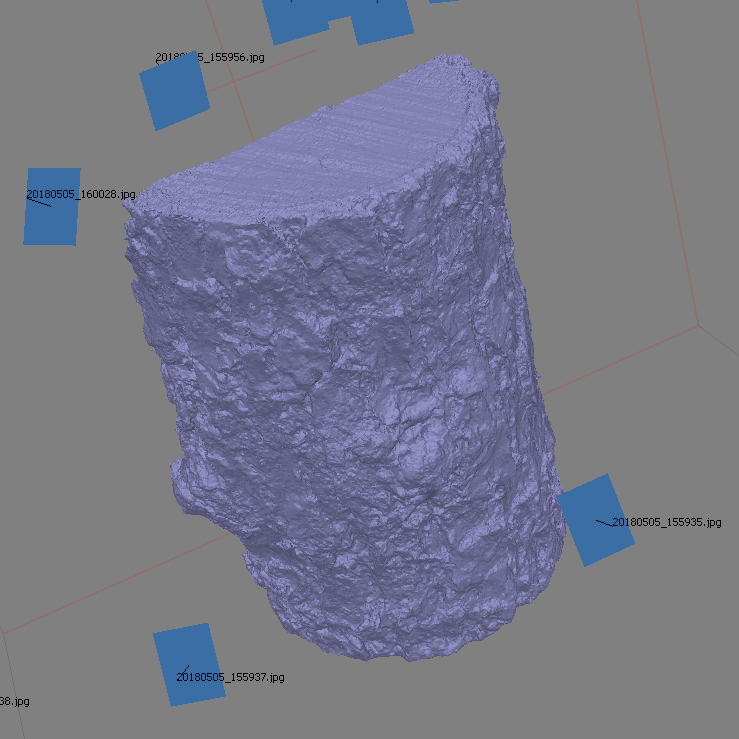
The whole process is based on the preparation of the model based on a dozen or several dozen pictures of the object made from different sides and at different angles. Then the appropriate software is able to calculate the positions of particular points of which the object consists (the so-called point cloud). When the points are ready, they can be transformed into a mesh, and then, if the software allows, there could be a texture generated.
The most popular photogrammetry applications are 3DF Zephyr, ContextCapture, Agisoft Photoscan, Pix4Dmapper, RealityCapture and Photosketch.
On the example of Agisoft Photoscan (currently named Metashape) I will try to explain how the process of creating the model looks like.
At the beginning, we must have prepared dozens of pictures of the object from every side. It’s good to take a picture so that it is in the center of the frame at all times and does not go beyond it. It is also important that photos are not moved or overexposed. It is best if the object is mat and does not have a very reflective material, because such reflections can be very confusing algorithms of the software. In the case of a more complicated thing, after finishing the photos, you can do some close-ups on some elements. There is also an option to print the appropriate markers and use them for taking photos, but I will try to discuss this in the future.
When we have the photos ready, we proceed to upload them in the application. Then we have a choice, either complete the whole process automatically, or mark the points on the object yourself in the photos. After that, we can proceed to the aligning of photos. If all goes well, we will have a sparse point cloud. If not, we have to add aligning points ourself.
With a ready sparse point cloud we must then make a dense point cloud, which is a more accurate version with a lot more points. On its basis, we can make the mesh of the object. If we want to have a high-quality model, this grid can have up to 5 million polygons. When it is ready, Photoscan can also make textures of our model. It is good to have it in the highest possible resolution.

After the entire process performed in Agisoft Photoscan, we can export the model as OBJ and import it to our favorite 3D application. We can also try to optimize the model, e.g. in programs such as Z-Brush. In a short time I will try to describe how this optimization proccess looks like.
Tips for 3ds max Beginner Users
Tips for 3ds Max beginner users. Topology Optimization: Learn to create models with optimal topology, ensuring a minimal number of triangles and proper vertex distribution. Optimizing the topology of a model is crucial to achieve[...]
New Tools in Unreal Engine 5
Epic Games is making improvements to modeling in the new Unreal Engine 5. Thanks to the addition of a new technology called Nanite, it will be possible to enter data from Quixel and Reality Capture,[...]
USD for 3ds max
Autodesk recently announced that the USD beta plug-in beta for 3ds max 2022 will be publicly available. Users who are creating virtual reality projects for iOS on iOS will be pleased with this news. This[...]
Nuke 13
Nuke is one of the best video post-production tools out there and recently there was new version released. This software was used in the production of the greatest blockbusters. It is an ideal composition tool[...]
Sculptron 1.0
Sculptron is a GPU based software for sculpting and animation. Sculptron's main goal is not to compete with digital sculpting applications such as ZBrush. It is tasked with scupt animated meshes. It introduces many new[...]
Terrain Plugin
Terrain Plugin is a tool for 3ds max that allows you to generate landscapes inside this program. Recently a new version has been released. With Terrain Plugin for 3ds max, you can generate landscapes by[...]


